Friday, April 5, 2013

Eggless Sugar Cookies

My family, on both sides, is largely non egg consuming and to send across any baked goodies their way I am constantly in search of eggless recipes and good substitutes. I have experimented successfully with flax seeds, yogurt, bananas and found them to taste as good.

Sugar cookies have been on my mind for a long time, more for the glaze and how the amazingly talented people on YouTube are able to create pieces of art from them.

Found a recipe here on my search and found them to turn out beautifully with no loss in shape or them expanding, with no refrigeration required. The texture was more shortbread like, very good. I made half the recipe using All purpose flour entirely as I needed a pale background for the glaze. You can mix whole wheat flour and All purpose in the ratio of 2:1.

Next up, was a search for an eggless substitute for the royal icing that is usually used to glaze the icing.. had been dying to get my hands dirty (literally speaking) with the glaze. Found a good one here.


Lined up pretty!
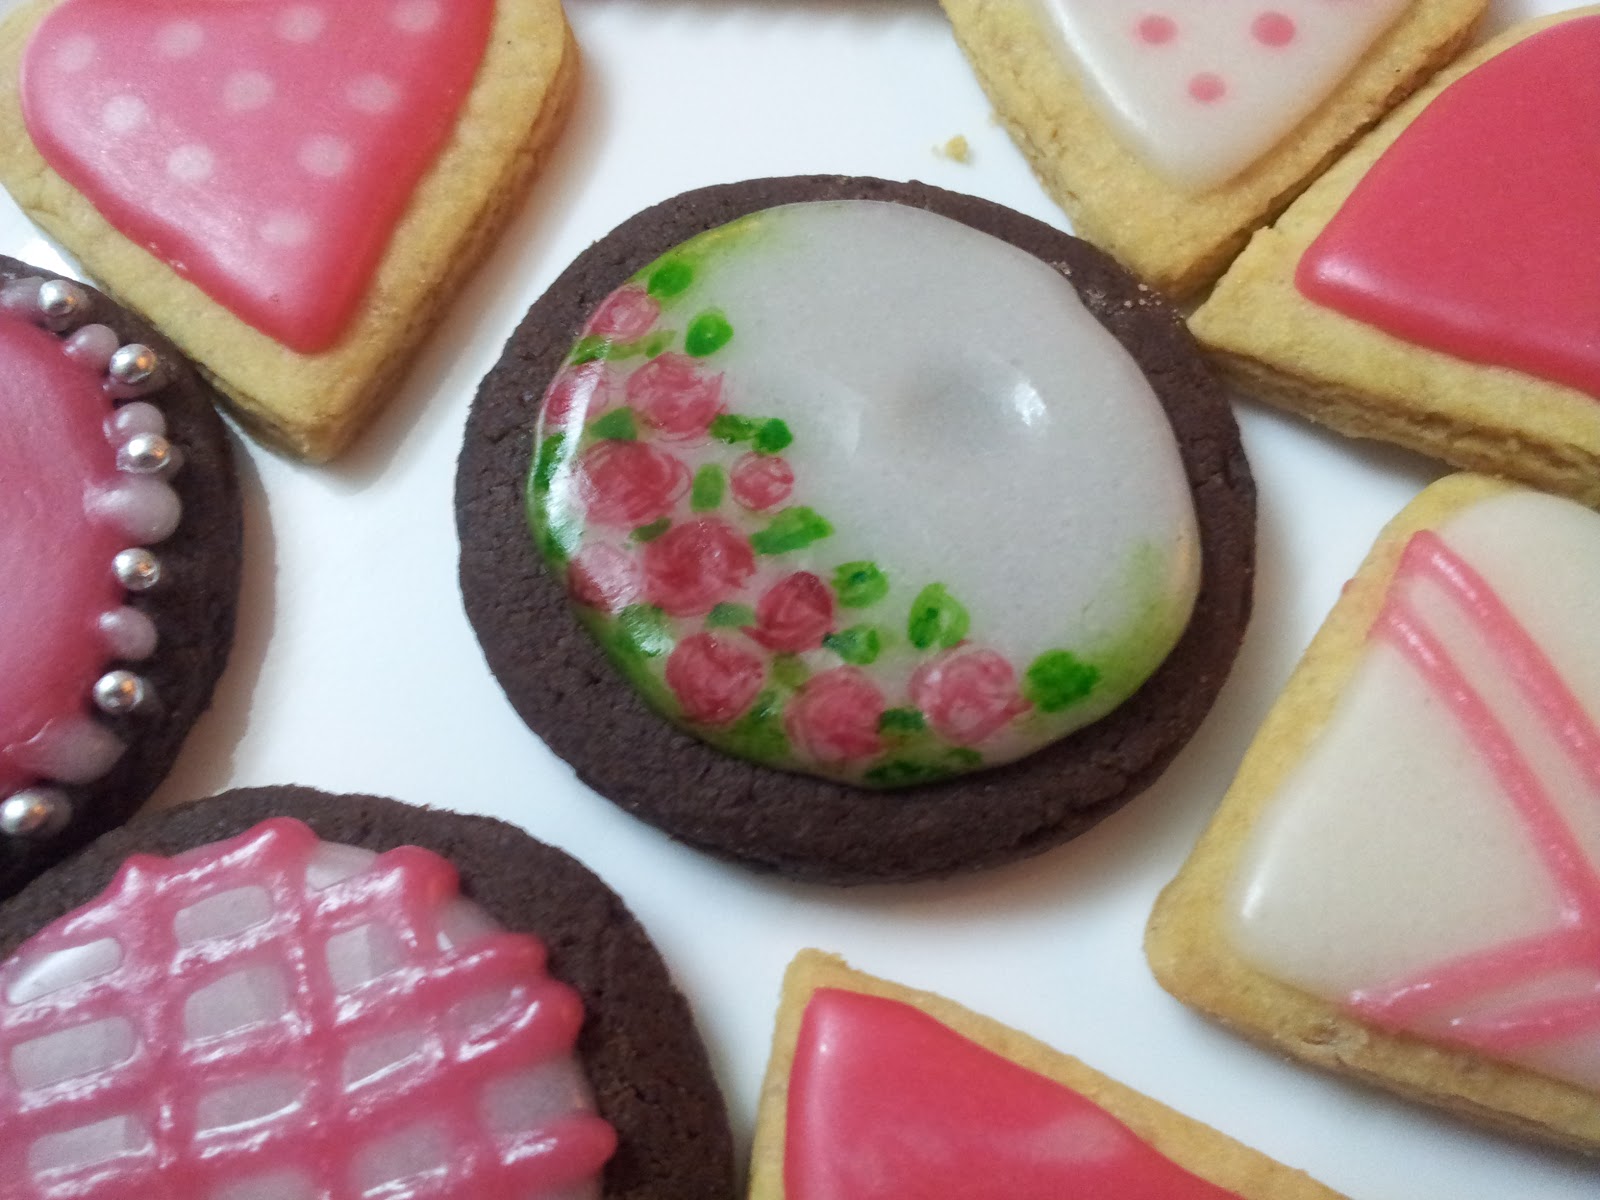
The hand painted one
The Cookies
Beat the sugar and butter in a bowl, with a hand mixer, till smooth and fluffy. Add the milk and vanilla and beat until combined.

In another bowl bowl, whisk together the flour, baking powder and salt. Add this to the wet ingredients in batches, and mix well by hand till combined. If the dough isn’t quite coming together, add a tsp or so of milk and knead. Do not be tempted to add too much milk or aim for a smoother consistency by kneading too much, the cookies may become tough.
  
On a flour dusted surface, roll the dough out uniformly till just about 1/4" thick. Cut out cookies with your cookie cutters and place them on parchment paper lined baking tray.

Bake them at 180C for 10 to 20 minutes, mine took 18-19 minutes. Look out for the cookies to turn golden at the edges staying pale inside. Cool on the tray for about 5 minutes and then cool completely on a rack.

Ingredients:
1 cup sugar
 200gm butter, softened at room temperature
3 to 5 tbsp milk
1 tsp vanilla extract
3 cups all-purpose flour
1 1/2 teaspoons baking powder
1/2 teaspoon salt


The Marbled effect

Doting on..
The Glaze
In a bowl, mix the corn syrup, sugar and milk thoroughly. You can add a drop of vanilla or almond extract or a few drops of lemon juice if you like. Put in an icing bag and use it to glaze the cookie. Create an outline first, it will harden almost immediately. Flood the enclosed design with more icing. You can make it smoother flowing by adding some milk, add a drop at a time. There are many helpful videos on YouTube.

Ingredients:
1 cup finely ground sugar
1 tbsp Corn Syrup
1 tbsp milk
A few drops of lemon juice
A few drops of vanilla/ almond essence


Monday, February 11, 2013

The Best Vanilla Cake

I do want to have "The Best" in my repertoire - the best chocolate cake, the best chocolate chip cookie, the best vanilla cake... you know, get the basics right with some foolproof recipes (and 2 kinds at that - With and without egg, because quite some of my immediate family do not eat egg). And with cakes, I am looking for cakes that use oil versus those that have butter. While there is no match for the flavor and texture butter brings in, it means that that you can't put it together just whenever you would like to what with the time required to soften it etc.

So coming to the cake, this is the best vanilla cake with eggs and with oil that I have baked/ had yet. I have been on the search for one for a while now. Among homemade cakes, I have a very special corner for Vanilla cakes a favor them even more than the chocolate ones. Some years back when Nestle was running small cafes in Delhi, there was a chocolate chip muffin they used to retail which I absolutely loved, so much so I even traced its origin to the Standard Coffee shop in Connaught Place. This cake, was very close to that, here it is.

Directions
  1. Preheat the oven to 180 degrees C.
  2. In a bowl, whisk together all purpose flour, corn flour, salt, baking powder till evenly mixed.
  3. WIn another bowl, whisk the eggs for 15 seconds with an electric mixer. Add the sugar and whisk for 30 seconds more. Add the vanilla and oil, whisk a little more.
  4. Add half the flour mix to the wet mix and blend it slowly, add half the buttermilk followed by rest of the flour and rest of the buttermilk. Scrape down the sides and blend it in.
  5. Bake for 35 minutes, browning the crust a little.

Ingredients
1 cup All purpose flour (maida)
1/4 cup Cornflour
1/2 tsp Salt
2 tsp Baking powder
3/4 cup powdered Sugar
1/2 cup vegetable Oil
2 Eggs
1.5 tsp Vanilla extract
1/2 cup buttermilk (If you dont have this on hand - Just add 1 tsp vinegar to 1/2 cup milk and allow to stand it for 5 minutes. Shake and use it.)

Wednesday, August 29, 2012

Homemade Waffles

Spring cleaning has its benefit.. Well, cleaning anytime has its benefit, a big one being finding things you thought you had lost. I had been looking for my never used waffle plates that came along with my Grill till I found it in a chance (and long over due) cleaning of my bed stashed between the drawers underneath.

Searched for a waffle recipe and this one with the "Best" in it, it had me curious. Whipped them up the next morning and they turned out great. Did increase the sugar to get nice, fluffy waffles!

Served with whipped cream and a slather of Nutella, they were perfect!


Mix all the dry ingredients in a bowl. Whisk together the wet ingredients and add to the dry ones. Stir and mix until moistened. Let the mix stand for some time. Pour into the heated plate and till browned and done.


Ingredients:

1 3/4 cup All purpose Flour
4 tbsp Sugar
1 tbsp Baking powder
2 Eggs
1 3/4 cup Milk
1/2 cup Oil
1 tsp Vanilla Essence

Thursday, July 19, 2012

Cinnamon Roll Cake

Husband's cousin's birthday last Saturday and he requested the Apple Pie.. Yes, a pie for his birthday. I had been eyeing a Chocolate fudge cake for the day but he requested something cinnamon-y. Pulled out this recipe which I had bookmarked long back. Turned out great, very flavorful.

It is actually a giant Cinnamon roll, with its texture, flavor and the glaze. Easy to make and just right for a cinnamon fix.


Preheat the oven at 180 degrees C. Whip the egg and mix everything except the butter. Stir in the butter slowly. Pour into a greased 8 or 9 inch round cake pan. For the topping, mix all the ingredients until well combined. Drop on the cake batter slowly and swirl it in with a knife. Bake at 180 degrees until the center when tested comes out baked, my oven took 35 minutes.

For the glaze, mix everything together and pour over the cake when it is still warm, you may want to wait for 10-15 minutes after the cake is out of the oven.

Ingredients

Cake:
1 1/2 cup flour
1/8 tsp.salt
1/2 cup sugar
2 tsp. baking powder
3/4 cup milk
1 egg
1 tsp. vanilla
1/4 cup butter, melted

Topping:
1/2 cup butter, softened
1/2 cup brown sugar
1 Tbsp. flour
1/2 Tbsp. cinnamon

Glaze:
2 c. powdered sugar
5 Tbsp. milk
1 tsp. vanilla

Monday, June 25, 2012

Lemon Cake with Lemon Glaze

Nothing spells summers like lemons (and of course mangoes!). I remember when my Mom would bottle sugar-lemon syrup and store it for quick shikanjis during summers. This has been on my "to-bake" list for a very long time. A simple easy recipe which promised a flavorful cake and did it live up! It had the tang and the crunch - from the glaze and had a very light texture. I made a small batch in a 6 inch bundt pan, cutting the original recipe into 1/3rd.

Pre-bake the oven to 180 degrees C and grease a 6 inch bundt pan. Beat the butter, sugar and salt till light and fluffy, do this well - I think it added a lot to the lightness of the cake. Add the egg and beat well. Add the baking powder. Add milk and flour, a small portion at a time and mix till you get a smooth mixture. Stir in the lemon extract. Pour the batter into the cake pan and bake for 40-45 minutes till a toothpick inserted into the centre comes out clean. The baking time would have to increase as you bake a bigger batch.

Stir together the sugar and lemon juice for the glaze as the cake is baking. Remove the cake from the oven when done and let it cool for 10 minutes. Remove from the pan and have the right side up. Pierce the top with a fork and give the glaze a stir. Start brushing the glaze onto the still warm cake. Brush on more till all of it is used up.


Let the cake cool completely before slicing. The cake turned out lovely! I did up the quantity of the lemon extract. The only change I would make for the next time would be to use the lemon rind for a more natural flavor.

Ingredients:
Cake
1/3 cup unsalted butter
2/3 cups sugar
1/3 teaspoon salt
1 large egg
2/3 teaspoons baking powder
1 cup maida/ all purpose flour
1/3 cup milk
finely grated rind of 1 lemon OR 1/2 teaspoon lemon extract

Glaze
1/6 cup freshly squeezed lemon juice
1/4 cup sugar


Sunday, June 17, 2012

Apple Pie

I am a chocolate person. That is how I divide desserts in my head - Chocolate & Fruit. I would most usually pick up the chocolate ones given a choice except for this one which is very special to me. I can't resist this apple-y cinnamon-y flavor, in fact I am finding a new love in all things cinnamon-y...

So, I thought high time I got to baking this. Almost all experiences of making one spoke about their intimidation by the crust - so here i sat intimidated by a thing i had not even started to start. Further, all recipes I read spoke about store bought pastry crusts which are not available here. Next up, search for making the crust from scratch and all of them required a food processor to make the dough - I don't own that either! Searching next for a handmade homemade crust got me to this which included a great tip for those attempting it by hand. I figured the food processor was necessary to not have the butter melt when handling it by hand. This lenghtened the process but in the end the crust shone no less than the filling.

For the apple stuffing I decided to go by this recipe which spoke about macerating the apples in sugar which causes the apples to release their juices. While most recipes took an easier route just adding the sugar and spices to apples and piling them in the crust, this one explained that doing so would leave a gap between the top crust and the apples when baked as they would tend to shrink. And I can vouch it worked, the filling had a delicious caramely taste with apples that were tender and juicy to taste.

I used Fuji apples, 4 of them for an 8" loose bottomed pie/ tart pan that was 1" high.

For the crust
Freeze the butter for at least 30 minutes.In a bowl whisk together the flour and salt.

Grate the butter into the flour and using a rubber spatula, form roll it into the flour so that it is evenly coated.

Sprinkle some water over it and continue to mix with a spatula/ fork till the dough starts to stick together adding water as required. Roll it into a disc on a clean surface, wrap in a plastic cling wrap and refrigerate for atleast an hour. Remove dough from refrigerator. If stiff and very cold, let stand until dough is cool but malleable. Roll one dough disk on a lightly floured surface into a 12-inch circle. Transfer the dough to a 9-inch pie pan and gently press dough into sides of pan leaving portion that overhangs lip of pie plate (this would be later used to seal the edges) in place. Refrigerate while preparing fruit. Prepare the top crust similarly and refrigerate when not in use.

For the filing
In a large bowl combine the sliced apples with the sugars, lemon juice, ground cinnamon, nutmeg, and salt. Let sit at room temperature for at least 30 minutes or up to three hours. Next, drain the apples  for about 15-30 minutes or until you have about 1/4 cup of juice. Pour the juices in a heatproof big enough bowl and add the 2 tablespoons (28 grams) of unsalted butter. Place in the microwave and boil the liquid, on high, about 5 minutes or until the liquid has reduced to about 1/6 cup and is syrupy and lightly caramelized.
Putting it together
The crust was buttery and flaky, though I felt i could have rolled it thinner. The filling and the crust made for a great pie and one happy confident me.  
Remove the top pastry crust from the refrigerator and let it sit at room temperature for about 10 minutes so it has time to soften. Do not wait for it to get totallly soft but just so long as it takes to yield under your rolling pin. Transfer the drained apples slices to a large bowl and toss them with the corn flour. Pour the reduced syrup over the apples and toss to combine. Pour the apples into the chilled pie crust. Moisten the edges of the pie shell with a little water and then place the top crust over the apples. Tuck any excess pastry under the bottom crust and then crimp the edges using your fingers or a fork. Using a sharp knife, make a few 2-inch (5 cm) slits from the center of the pie out towards the edge of the pie to allow the steam to escape. Cover the pie with plastic wrap and place in the refrigerator to chill the pastry while you preheat the oven.

Preheat the oven to 220 degrees C. Cover the floor of the oven with an aluminium to catch any overflowing juices. Place the lower rack in the oven and the pie tin over it. Bake for 30 minutes. Place a foil ring over the edges and continue to bake at 160 degrees C for 20 more minutes till the crust is golden in color and the apples are tender (not mushy) when tested through the slits. Transfer the pie to the wire rack and let it cool till it reaches room temperature. I left it overnight in the face of consistent advice to not dig into fruit pies immediately.


Served it at room temperature with whipped cream!


Ingredients

Pie Crust
21/2 cups all-purpose flour
1 teaspoon salt
1 cup unsalted butter
6-8 tablespoons ice water, plus more if needed

Apple Filling:
4 apples (around 500 grams) peeled, cored, and sliced 1/4 inch thick
25 grams granulated white sugar
28 grams light brown sugar
1/2 tablespoon lemon juice
1/2 teaspoon ground cinnamon
1/8 teaspoon ground nutmeg (optional)
1/8 teaspoon salt
1 tablespoons unsalted butter
3/4 tablespoons corn flour

Wednesday, May 9, 2012

Rainbow "Gems" cookies

Little ones loves "Gems" - the bright, multi-colored sugar enrobed chocolate discs (what's there not to love!). Came across these cookies with M&Ms in them and decided to give them a desi shot with more readily available Cadbury's Gems.

I halved the recipe to begin with and increased the baking time to not have soft centres (Don't get me wrong - I love the soft, chewy types, in fact more than the crispy one). These cookies came out very well, rich, solid flavor and a nice texture and would definitely form a good base to any kind of additives - raisins, chocolate chips, dried fruits etc.

To start with, put your child to sleep or away from the kitchen else you wouldn't have any Gems left to make cookies with. Weigh and get your ingredients ready. Take your time to admire these bright happy faced Gems.

Now, go close the door of the room where your child is as the mixer may disturb her (remember, she is sleeping!). Pre-heat the oven at 160 degrees C. Whisk together the eggs, brown and white sugars with an electric mixer till light colored and creamy (picture on the left). Whisk together the flour and baking soda and keep aside. Gradually, add the flour mix and stir to form a dough. Fold in the Gems.

Plop tablespoonfuls on a greased baking sheet covered tray or use the method to shape the cookies mentioned here (stacking two ripped-apart halves of cookie dough balls one on top of the other).

Bake for 10-12 mins till the sides turn golden and the centres puffy. Let cool completely on the wire rack and Enjoy!


Ingredients:

2 cups + 2 tablespoons all-purpose flour
1/2 teaspoons baking soda
1 1/2 sticks (12 tablespoons) of salted butter, melted and cooled
1 cup brown sugar
1/2 cup sugar
1 egg + 1 egg yolk, at room temperature
2 teaspoons vanilla extract
1 cup Gems (around 20 small - 23grams packets)